Master IoT Remotely: Web SSH Server On Windows 10 Guide
Are you seeking a robust method to control and monitor your Internet of Things (IoT) devices from anywhere in the world? Mastering the art of setting up a remote IoT web SSH server on Windows 10 is not just a valuable skill; it's an essential capability that unlocks a new level of efficiency and security in managing your connected devices.
The digital landscape is rapidly evolving, with IoT devices becoming increasingly prevalent in both personal and professional environments. From smart home appliances to industrial sensors, these devices generate vast amounts of data and require constant monitoring and management. A remote IoT web SSH server provides a secure and efficient means to accomplish this, ensuring that you can access and control your devices regardless of your physical location.
This comprehensive guide will navigate you through the intricacies of establishing and securing a remote SSH server on Windows 10. We'll explore the core concepts of SSH, delve into its advantages, and provide step-by-step instructions to get you up and running. By the end of this journey, you'll possess the knowledge and confidence to manage your IoT devices remotely with ease.
The heart of this solution lies in the Secure Shell (SSH) protocol. SSH acts as a secure bridge, encrypting all traffic between your computer and your IoT devices, thus protecting your data from potential threats. It's the cornerstone of a secure remote management strategy, eliminating the risk of eavesdropping, connection hijacking, and other malicious attacks. This guide will clarify the process, ensuring you set up your server effectively.
The power of remote access offers unparalleled flexibility. Whether you're troubleshooting a device, updating firmware, or simply monitoring performance, a remote SSH server puts you in complete control. This guide will delve into the steps needed to enable SSH, configure your IoT devices, set up the necessary port forwarding, and fortify your server against potential vulnerabilities.
Setting up a remote IoT web SSH server on Windows 10 is more than just a technical exercise; it's an investment in the future of your device management strategy. It enables you to seamlessly connect to your IoT devices, giving you peace of mind, especially when you need to resolve issues in real time. This is increasingly valuable as more businesses and individuals rely on IoT devices.
Ready to dive in and get your hands dirty? Let's begin with the foundation: enabling the SSH client on your Windows 10 machine.
First, make sure the SSH client is enabled on your Windows 10 device. Go to Settings.
Remote IoT web SSH server on Windows 10 is a valuable skill that can enhance your ability to manage IoT devices effectively, offering a seamless way to control and monitor IoT devices from virtually anywhere. By following the steps in this guide, you can configure and optimize your SSH server for smooth, secure remote access. This guide aims to demystify the process and will walk you through everything you need to know about setting up and managing a remote IoT SSH server on Windows 10.
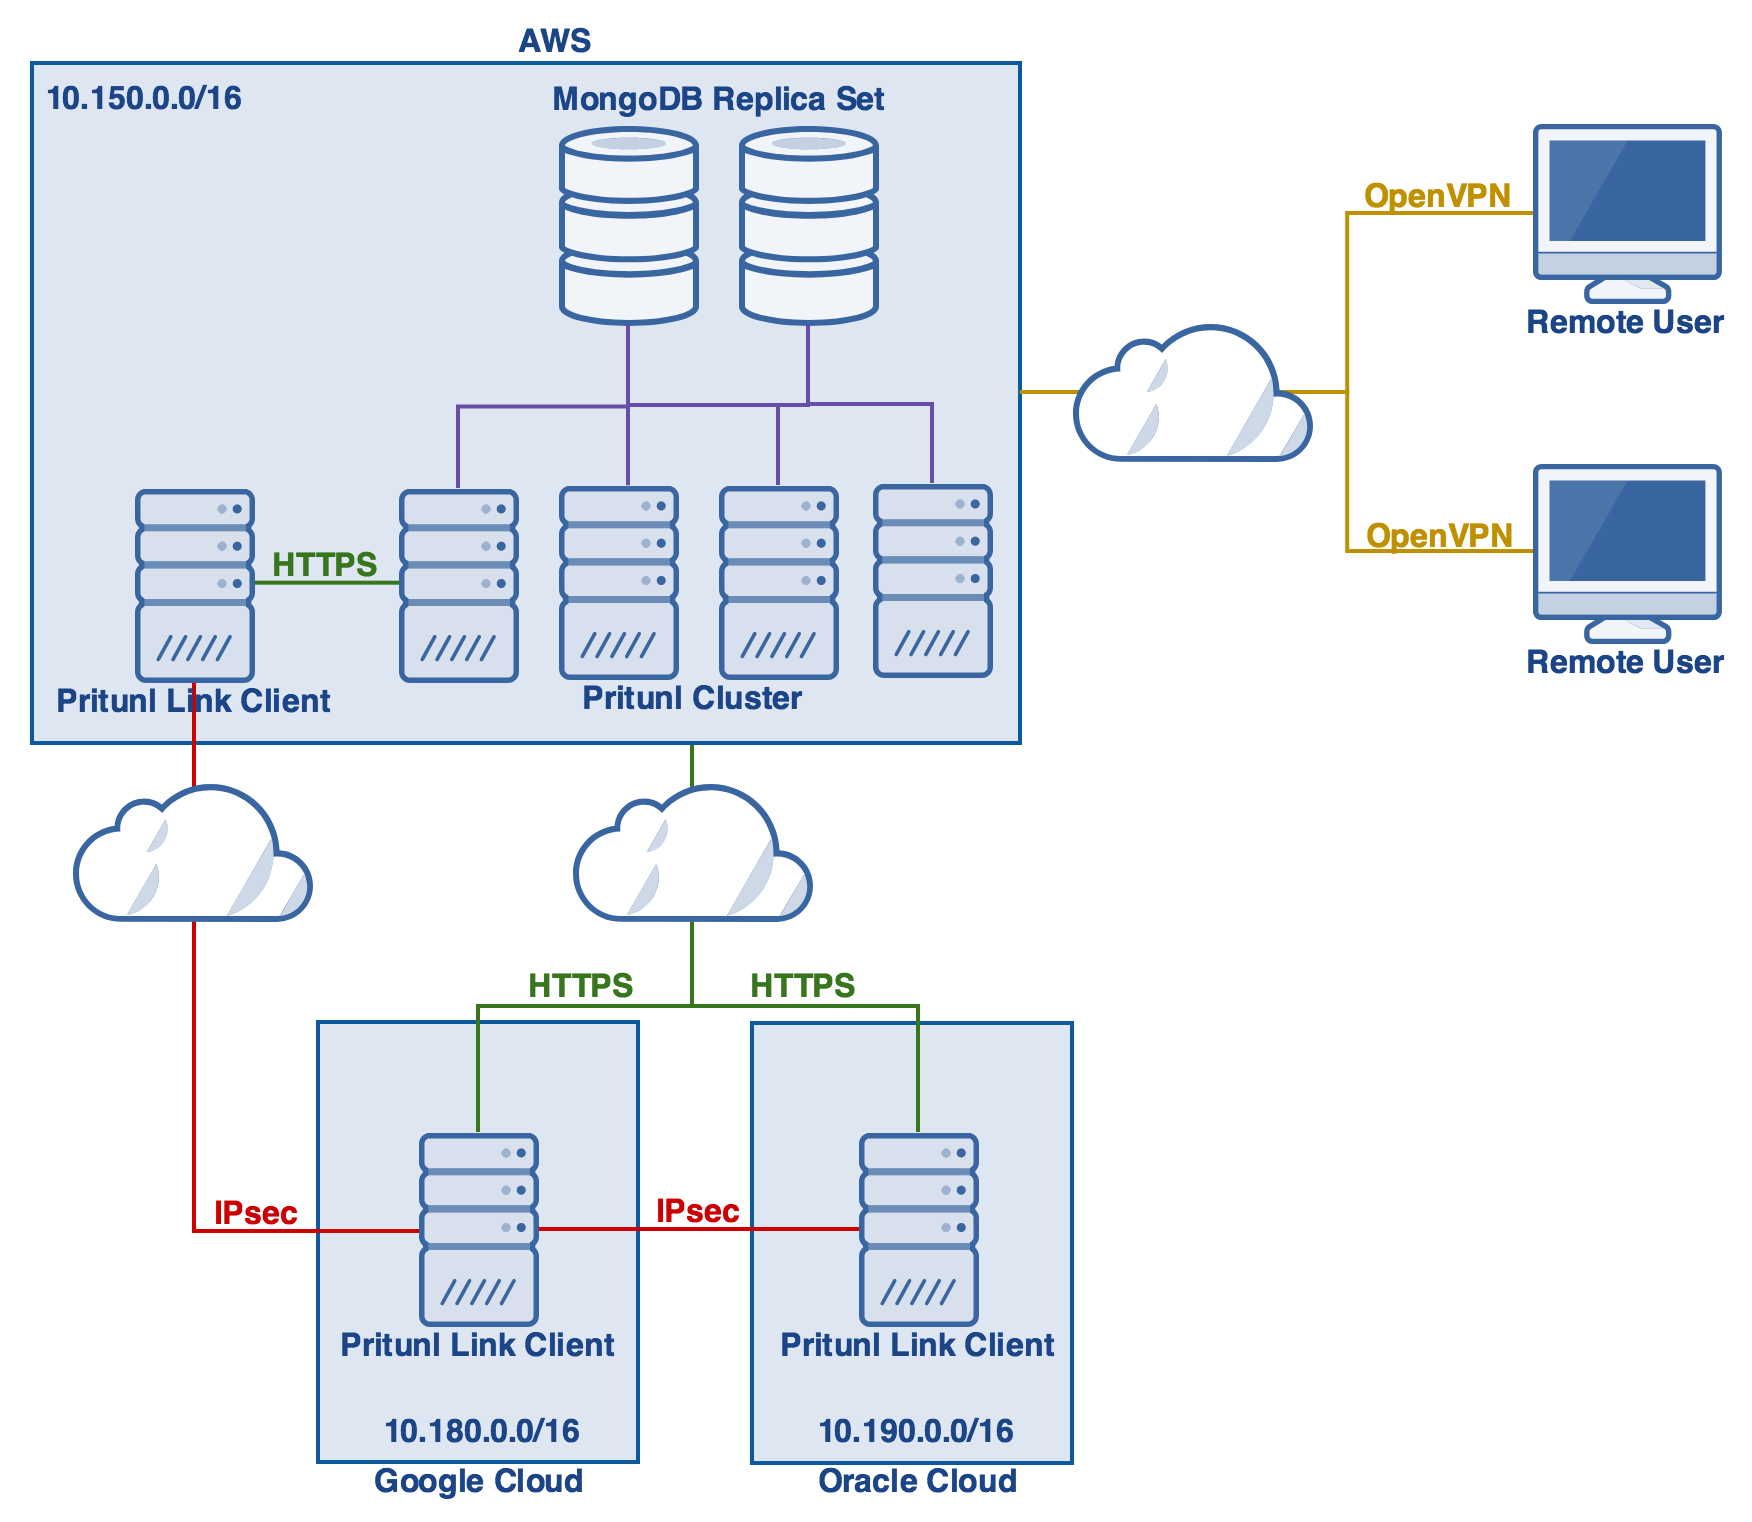
Remote IoT web SSH server is essentially a software solution that enables remote access to your Windows 10 machine through SSH, a secure network protocol. It encrypts all traffic between client and server to eliminate eavesdropping, connection hijacking, and other attacks.
Heres a quick command to connect: In this example, "max" is the username on the remote Windows computer, and 192.168.13.12 is the IP address or DNS name of the computer.
As more businesses and individuals rely on IoT devices, the demand for secure remote access grows exponentially. When you use SSH to connect to a remote server, a graphical SFTP browser will automatically pop up in order to directly edit your remote files. Your remote applications will also display seamlessly on your Windows desktop using the embedded X server.
Bitvise SSH Server is a powerful tool to consider. It is an SSH, SFTP, and SCP server for Windows. It is robust, easy to install, and works well with a variety of SSH clients, including Bitvise SSH Client, OpenSSH, and PuTTY. The SSH server is developed and supported professionally by Bitvise.
OpenSSH server is available as an optional feature in all new versions of Windows starting with Windows 10 (build 1809) and Windows Server 2019. The OpenSSH server feature can be installed on Windows 10 and 11.
Setting up a remote IoT web SSH server on Windows 10 is an essential skill for modern IT professionals and hobbyists alike. Remote IoT over internet Windows 10 has become a crucial aspect of IoT management. It is a comprehensive guide that allows users to connect and manage IoT devices over the internet.
Myrtille is an open-source solution that provides web access to servers, desktops, and applications. To achieve this, it relies on the SSH and RDP protocols to send the user's actions from the browser to the remote side, through a web gateway, and stream back the display and audio with a constant focus on performance.
Setting up a remote IoT web SSH server on Windows 10 offers a seamless way to control and monitor IoT devices from virtually anywhere. The comprehensive guide will help you to master this essential skill. Here's a structured guide with actionable steps to make this achievable.
Before diving into the technical aspects, let's establish the foundational reasons why you would want to set up a remote IoT web SSH server on Windows 10:
- Remote Monitoring and Control: Access and manage your IoT devices from any location with an internet connection. Monitor device status, configure settings, and troubleshoot issues without needing to be physically present.
- Enhanced Security: SSH provides a secure, encrypted connection, protecting your IoT devices and data from unauthorized access. SSH ensures that your communications remain private and secure.
- Efficient Troubleshooting: Remotely diagnose and resolve issues, reducing downtime and the need for on-site visits. Quickly address problems and ensure your devices are operating at their best.
- Centralized Management: Manage multiple IoT devices from a single interface, simplifying operations and increasing efficiency. Control and monitor all your devices from a central point.
- Data Security: SSH connections protect your data and ensures that your communications remain private and secure, crucial in the age of increasing cyber threats.
This will provide the confidence and expertise necessary to implement and maintain a secure remote access solution for your IoT infrastructure.
Let's look at this information in a table:
| Aspect | Details |
|---|---|
| Objective | Establish a secure remote access system for managing IoT devices on Windows 10. |
| Core Technology | Secure Shell (SSH) protocol for encrypted remote connections. |
| Benefits | Remote monitoring and control, enhanced security, efficient troubleshooting, centralized management, data security. |
| Components | SSH client on Windows 10, SSH server (e.g., OpenSSH or Bitvise), IoT devices. |
| Key Steps | Enable SSH client, configure the SSH server, configure port forwarding, and secure the server. |
| Outcome | Secure remote access to IoT devices for management and monitoring. |
| Tools | Windows 10, an SSH client (like PuTTY or the built-in client), and an SSH server (like OpenSSH Server or Bitvise SSH Server). |
| Target Audience | IT professionals, hobbyists, and anyone managing IoT devices. |
Now, lets start the step-by-step guide on setting up and configuring a remote SSH server on Windows 10.
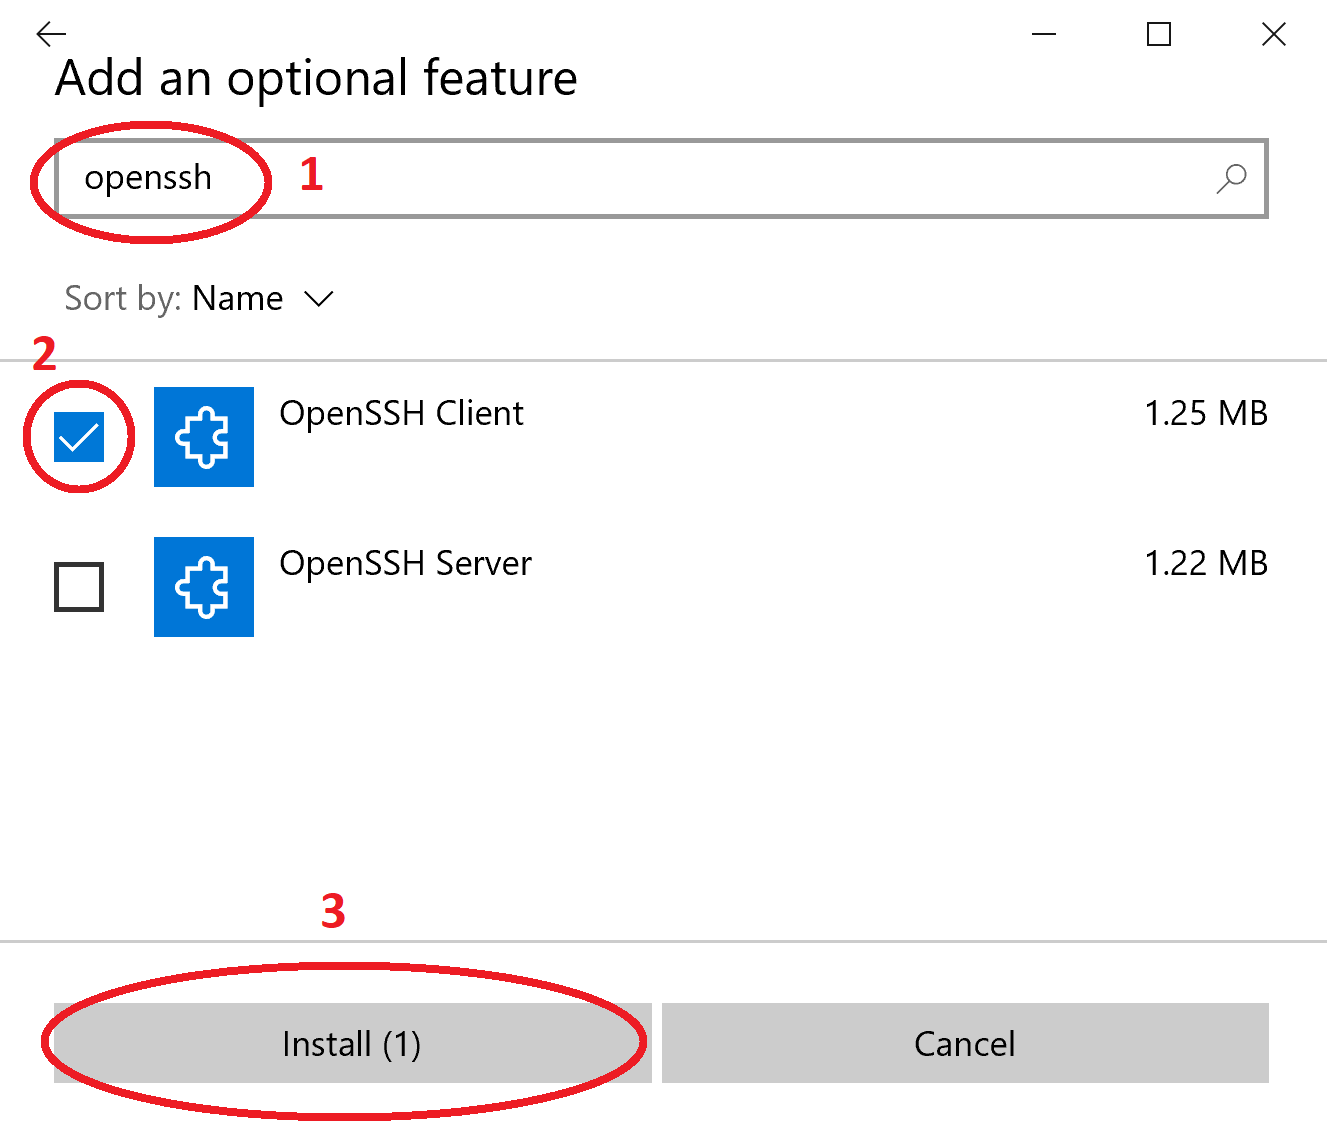
Step 1: Enabling the SSH Client on Windows 10
The first critical step is to make sure the SSH client is activated on your Windows 10 machine. This client will be the tool you use to connect to the remote SSH server. Here's how to do it:
- Open Settings: Click the Start menu, then click the gear icon to open the Settings app.
- Navigate to Apps: In the Settings window, click on "Apps".
- Manage Optional Features: Select "Apps & features", then click "Optional features".
- Add a Feature: Click "Add a feature".
- Install OpenSSH Client: Scroll down the list of available features, locate "OpenSSH Client", check the box next to it, and click "Install".
- Wait for Installation: Allow the installation to complete. This process may take a few minutes.
- Verify Installation: After the installation is complete, you should see "OpenSSH Client" listed in your "Optional features" section.
You have now successfully enabled the SSH client on your Windows 10 machine. This client enables you to connect to remote SSH servers.
Step 2: Installing and Configuring the SSH Server
Windows 10 provides the OpenSSH server feature, making it easy to set up an SSH server. Heres how to install and configure it:
- Open Settings: Open the Settings app.
- Navigate to Apps: Click on "Apps".
- Manage Optional Features: Select "Apps & features" and click "Optional features".
- Add a Feature: Click "Add a feature".
- Install OpenSSH Server: In the "Add a feature" window, locate "OpenSSH Server", select it, and click "Install".
- Start the SSH Service: Once installed, you need to start the SSH service.
- Open Services: Type "services" in the search bar and open the "Services" app.
- Locate and Start SSH Service: Scroll down to "OpenSSH SSH Server". Right-click on it and select "Properties".
- Set Startup Type: In the "Properties" window, under the "General" tab, set the "Startup type" to "Automatic" to ensure the service starts every time your computer boots up.
- Start the Service: If the service isn't running, click the "Start" button.
- Configure the Firewall: Windows Firewall needs to allow incoming connections to the SSH server.
- Open Windows Defender Firewall with Advanced Security: Type "firewall" in the search bar and open "Windows Defender Firewall with Advanced Security".
- Create a New Rule: In the left pane, click "Inbound Rules". In the right pane, click "New Rule...".
- Select Rule Type: In the "New Inbound Rule Wizard", select "Port" and click "Next".
- Specify Protocol and Ports: Choose "TCP" and enter "22" in the "Specific local ports" field (SSH uses port 22 by default). Click "Next".
- Choose Action: Select "Allow the connection" and click "Next".
- Select Profile: Select the network profiles where this rule should apply (Domain, Private, Public) and click "Next".
- Name the Rule: Give the rule a descriptive name (e.g., "Allow SSH") and click "Finish".
This configuration secures the remote access to your IoT devices and guarantees a reliable connection for monitoring and managing your devices.
Step 3: Configuring Your IoT Devices for Remote Access
Your IoT devices need to be set up to work with the SSH server. This typically involves the following steps:
- Ensure SSH is Enabled on the Device: Most IoT devices support SSH. Check your device's documentation on how to enable SSH. This often involves accessing the device's configuration menu or using a specific command.
- Obtain the Device's IP Address: You will need the IP address of your IoT device to connect to it. This can usually be found in the device's network settings or your router's admin panel.
- Set Up User Accounts: Create user accounts on your IoT devices for SSH access. Assign strong passwords to these accounts.
- Test the Connection: Use an SSH client (like the built-in SSH client in Windows 10 or PuTTY) to test the connection to your IoT device. Use the command `ssh username@device_ip_address`.
By doing this, you set up your devices to work with the SSH server. Following these measures will ensure secure access and effective control of your IoT devices, which facilitates remote management and monitoring.
Step 4: Setting Up Port Forwarding
Port forwarding is necessary because your SSH server and IoT devices are likely behind a router, which means they have private IP addresses. Port forwarding makes your SSH server accessible from the internet.
- Access Your Router's Configuration: Open a web browser and enter your router's IP address (usually 192.168.1.1 or 192.168.0.1). You will need your router's username and password.
- Find Port Forwarding Settings: Look for the "Port Forwarding", "Virtual Servers", or similar section in your router's settings. The location of these settings varies depending on your router model.
- Create a New Rule: Create a new port forwarding rule.
- Enter the Information: Enter the following information:
- Service/Name: A name for the rule (e.g., "SSH").
- Protocol: TCP.
- External Port: 22 (the default SSH port).
- Internal Port: 22.
- Internal IP Address: The internal IP address of your Windows 10 machine.
- Save the Rule: Save the rule and apply the changes.
After setting up port forwarding, your SSH server will be accessible from the Internet. The security protocols will provide safe and dependable access to your devices, regardless of where you are.
Step 5: Securing Your SSH Server
Securing your SSH server is a critical step to prevent unauthorized access and protect your IoT devices. Here's how to enhance the security of your SSH server:
- Change the Default SSH Port: Change the default SSH port (22) to a non-standard port. This can help to reduce automated attacks.
- Disable Root Login: Disable direct root login to prevent attackers from attempting to brute-force the root password.
- Use Strong Passwords: Enforce the use of strong, unique passwords for all user accounts on your SSH server and IoT devices.
- Enable Two-Factor Authentication (2FA): Implement 2FA to add an extra layer of security. This typically involves using an authentication app on your phone or receiving a code via SMS.
- Use Key-Based Authentication: Configure key-based authentication instead of password-based authentication. This is a more secure method, where you use a cryptographic key pair to authenticate.
- Update Regularly: Keep your SSH server and Windows 10 up to date with the latest security patches.
- Monitor Logs: Regularly review the SSH server logs for suspicious activity, such as failed login attempts.
- Implement Firewall Rules: Use a firewall to restrict access to your SSH server to only trusted IP addresses.
- Limit Login Attempts: Configure your SSH server to limit the number of failed login attempts to prevent brute-force attacks.
Following these measures will greatly strengthen the security of your SSH server, safeguarding your IoT devices and data from potential threats.
Step 6: Connecting to Your SSH Server and Devices
Once your SSH server and devices are configured, you can connect to them remotely. Use an SSH client to connect. Enter the following information:
- Host Name or IP Address: The public IP address of your network or your domain name.
- Port: The port you set up for SSH (e.g., 22 or the port you changed it to).
- Username: Your username on the remote device.
- Password or Private Key: Enter your password or browse for your private key if using key-based authentication.
Using these steps, you can set up your SSH server and IoT devices, enabling remote access and improving how you manage and monitor your devices. With increased safety measures, you can protect your linked devices from dangers.

Detail Author:
- Name : Laurianne Rogahn
- Email : qtorp@gmail.com
- Birthdate : 1996-05-07
- Address : 584 Adelbert Row Connmouth, MN 79774-8096
- Phone : 1-747-956-1198
- Company : Harris PLC
- Job : Range Manager
- Bio : Asperiores quisquam exercitationem id. Dolorem minima sint consequatur enim. Soluta neque quia aut officiis aperiam iure.

 devices from anywhere in the world? Mastering the art of setting up a remot)